Showing posts with label diy. Show all posts

Thursday, July 25, 2013

Guest Post: Christmas in July is about planning!

Hi! I’m Wendy Zingher, and I’m the project manager for Dover Pictura. I was asked to write a guest blog post this week, with Christmas in July as our guiding theme. This week we are all about starting early! 

Why am I posting? I’m not a terribly good DIY-er, and I celebrate Chanukah. But I do have a lot of experience with project management, and what Christmas giving and technology management have in common is planning!  These are my top 5 tips for planning your DIY activities.

Top 5 Planning Tips


#1: Identify the recipients!
In software projects, we identify the need. What is the business need of our customers? In a crafting project, we’d ask – who am I making gifts for? Make a list of your recipients. As much as I like napkins and the backs of envelopes, for planning, I’m a fan of spreadsheets. I’d put the list on a spreadsheet, and the gift next to it.

#2: What do you need?
In a tech project, you want to know who is doing the development, and what training and tools they need. For a crafting activity, you’ll need to know what you need, and where you are going to get your supplies. Make that shopping list! If  you are using tutorials, they’ll have the list of supplies up front. I like keeping links to my online tutorials, or a note to the book/magazine, and I write down the page – still on my spreadsheet.

#3: Do the hard stuff first.
Figure out the parts of the project that are risky. Is there something you don’t know how to do? I say that’s risky! For me, that’s the knitting project. So, try putting that first, so you give yourself time to figure it out, and learn from mistakes.

#4: Pad your timeline.
Leave more time than you need. In software projects, optimism is sometimes not a good strategy. So, add extra time to your timeline, because you will run into snags.

#5: Plan for finishing touches.
In a software project, that means testing and more testing. For DIY’ers, that means creating that perfect wrapping so your gift looks as special unwrapped as it does when your recipient opens the box and oohs and ahhs.

Here’s a simple spreadsheet, that will make your planning easy:


While I was putting together the spreadsheet, it helped me spread my DIY wings. There are so many easy and beautiful gifts you can make with stencils. I had no idea!  I found some fabulous stenciling ideas, in keeping with our theme this week. Did you see our collections of stencil images on DoverPictura this week? 

With DoverPictura stencil images, you can make great stuff like this tablecloth and napkin from Design Sponge.


Or awesome wall decals from Homemade Simple
(wall decals sell for $22 each on Fab.com)


Or a placemat for your pet's food bowls! Really.


How do you plan for gift making? Please share your story. Comments welcome!


Monday, July 22, 2013

Tutorial: From Clip Art to Knitting Chart


Hi! I’m M. C. Waldrep, needlework enthusiast and editor-in-chief of Dover Publications. There are only 155 days until Christmas...and every year I formulate ambitious plans to start making all of my Christmas gifts in July! Well this year, inspired by the great images on DoverPictura.com, I am determined to do it – and at the same time demonstrate how you can turn a piece of clip art into a knitting chart with just a printer and Photoshop Elements.


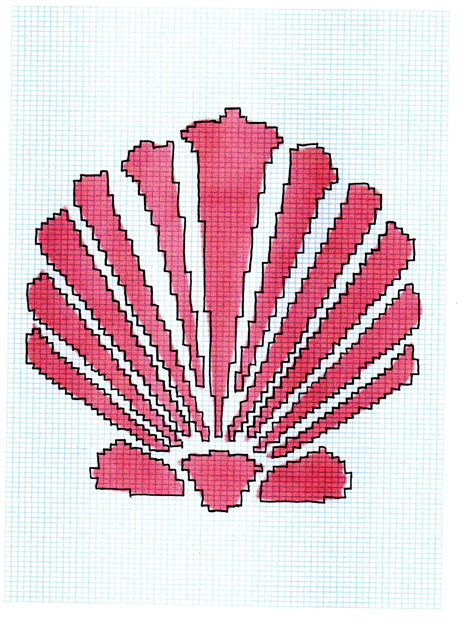
For my Christmas gift, I decided to make knitted pillows for a friend who just bought a new house. Because her new living room has a nautical theme, I thought a scallop shell was the perfect motif for her pillows.

I found a great shell in the Nature Stencil Designs collection (sheet 45). For my yarn, I chose Caron’s Simply Soft. I decided I wanted the shell to be about 10 to 10½ inches wide to make a 14-inch square pillow. Since the original image is close to square, the height would be about 10 inches as well. My first step was to knit a swatch to determine my gauge, which worked out to be 5 stitches and 6½ rows to an inch. This meant that my shell would be about 50 stitches wide.

The easiest way to get the image onto a grid is to print it onto knitter’s graph paper. Since a knit stitch is wider than it is tall, knitter’s graph paper has rectangles, not squares (Fig. 1). You can find the paper in some knit stores and online. Some sites even let you create the paper to your exact gauge rather than to a standard proportion.

Printed graph paper


Most of the graph paper is sized to fit on a letter size sheet of paper, so my shell was not going to fit on a single sheet at actual size. So, a little arithmetic was called for. Since I had already determined that my shell would be about 50 stitches wide, I measured the printed graph paper to see how wide 50 stitches would be. On my sheet 50 stitches measured a shade under 6¼ inches.


I opened my image in Photoshop Elements and cropped the image as close as possible to edges of the actual motif, eliminating any white space. I resized the image to 6¼ inches wide (keeping the ratio of the width and height linked). Because I wanted to see the underlying grid on the printed chart, I recolored the image to medium red.

Then I printed the image onto the graph paper (Fig. 2).


However, as you can see (Fig. 3), I still had a bit of work to do. 


Whenever you place a curved design on a rectangular grid, you will have to make adjustments. In this case the shell often covered only part of a rectangle, and I had to decide whether to make the stitch colored or plain. I outlined the edge of the motif with a felt tip marker to define the areas of color. This may sound tedious, but it makes the knitting so much easier. As I outline, I can tweak the chart to get the result I want. (Fig 4)


Now I was ready to start knitting. I worked up the design in two versions so you can see the different effects you can achieve.


On the solid color pillow, the shell is defined by texture alone – a stockinette stitch shell on a reverse stockinette background.


A third color could easily be added to the multicolor pillow by closing in the outer edge and working the ribs in a darker or lighter shade of coral. I also think this particular design would look beautiful with the shell worked in a variegated yarn.


The  method I used works best on simple designs with very clearly defined shapes. If you want to try more complicated designs with more colors, make your design larger and use thinner yarn so you have more stitches to work with. The larger your motif in relation to your gauge, the more detail you can add.

Now that you know how to create your own chart, you can use them to guide you through many other types of crafting projects, too – everything from tile work to needlepoint to painting!

- New to DoverPictura? Take advantage of our registration bonus. Click here to register and get three free image sheets!

Tuesday, July 16, 2013

Tutorial Tuesday: Catch of the Day Pencil Holder

Today's tutorial comes from one of our favorite craft blogs, Mod Podge Rocks!


The dedicated fisherman or outdoorsman in your life will love this quirky pencil holder. And it's surprisingly simple to make- you just need some wood, a drill, paint and, of course, clip art!

While this particular piece uses fish from our Sea Life collection, there are a number of fishy images in  this week's featured collection, The Great Outdoors, that work just as well- if you want to put your own special touch on this fun project.