
Hi! I’m M. C. Waldrep, needlework enthusiast and editor-in-chief
of Dover Publications. There are only 155 days until Christmas...and every year I formulate ambitious plans to start making all of my
Christmas gifts in July! Well this year, inspired by the great
images on DoverPictura.com, I am determined to do it – and at the
same time demonstrate how you can turn a piece of clip art into a knitting chart with just a printer and Photoshop Elements.

I found a great shell in the Nature Stencil Designs collection (sheet 45). For my yarn, I chose Caron’s Simply Soft. I
decided I wanted the shell to be about 10 to 10½ inches wide to make a 14-inch
square pillow. Since the original image is close to square, the height would be
about 10 inches as well. My first step was to knit a swatch to determine my
gauge, which worked out to be 5 stitches and 6½ rows to an inch. This meant
that my shell would be about 50 stitches wide.
The easiest way to get the image onto a grid is to print it
onto knitter’s graph paper. Since a knit stitch is wider than it is tall,
knitter’s graph paper has rectangles, not squares (Fig.
1). You can find the paper in some knit stores and online. Some sites even
let you create the paper to your exact gauge rather than to a standard proportion.
 |
Printed graph paper
|
Most of the graph paper is sized to fit on a letter size
sheet of paper, so my shell was not going to fit on a single sheet at actual
size. So, a little arithmetic was called for. Since I had already determined
that my shell would be about 50 stitches wide, I measured the printed graph
paper to see how wide 50 stitches would be. On my sheet 50 stitches measured a
shade under 6¼ inches.

I opened my image in Photoshop Elements and cropped the
image as close as possible to edges of the actual motif, eliminating any white
space. I resized the image to 6¼ inches wide (keeping the ratio of the width
and height linked). Because I wanted to see the underlying grid on the printed
chart, I recolored the image to medium red.
Then I printed the image onto the graph paper (Fig. 2).

However, as you can see (Fig. 3), I still had a bit of work to do.

Whenever
you place a curved design on a rectangular grid, you will have to make adjustments.
In this case the shell often covered only part of a rectangle, and I had to
decide whether to make the stitch colored or plain. I outlined the edge of the
motif with a felt tip marker to define the areas of color. This may sound
tedious, but it makes the knitting so much easier. As I outline, I can tweak
the chart to get the result I want. (Fig 4)
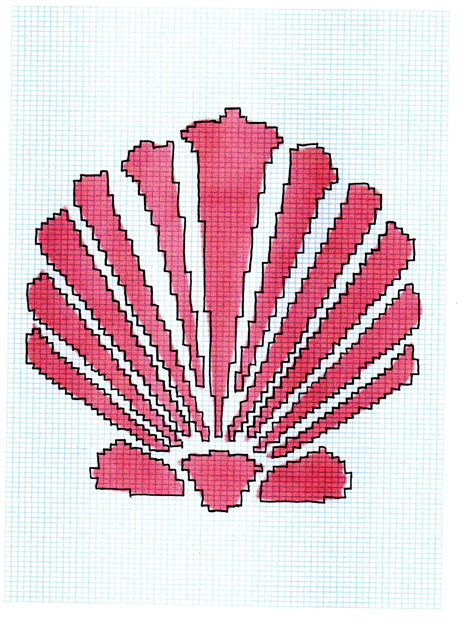
Now
I was ready to start knitting. I worked up the design in two versions so you can see the
different effects you can achieve.

On the solid color pillow, the shell is defined by texture
alone – a stockinette stitch shell on a reverse stockinette background.

A third color could easily be added to the multicolor pillow
by closing in the outer edge and working the ribs in a darker or lighter shade
of coral. I also think this particular design would look beautiful with the
shell worked in a variegated yarn.

The method I used works best on simple designs with very
clearly defined shapes. If you want to try more complicated designs with more
colors, make your design larger and use thinner yarn so you have more stitches
to work with. The larger your motif in relation to your gauge, the more detail
you can add.
Now that you know how to create your own chart, you can use them to guide you through many other types of crafting projects, too
Now that you know how to create your own chart, you can use them to guide you through many other types of crafting projects, too
- New to DoverPictura? Take advantage of our registration bonus. Click here to register and get three free image sheets!


